Adding a New From Address Domain
- Table of Contents
- Overview
- Step 1: Collect all necessary information
- Step 2: Create a DKIM key
- Step 3: Create DNS records
- Step 4: Setup the Yahoo Feedback Loop
The Sender header is rarely used, and would only be needed in instances where you do not have the ability to update DNS records for the domain in the From Address. In GreenArrow Studio, this address is set in the Sender field.
Overview
This document describes how to add a From Address Domain into GreenArrow Engine. This does not configure the domain name for use as a Return-Path or URL Domain.
Step 1: Collect all necessary information
-
(
A1)From Address domain- This is the domain to be used in theFromaddress of your email. TheFrom Address domainis the portion of the email address that comes after the@symbol. For example,greenarrow-example.comis theFrom Address domainin[email protected]. -
(
A2)Authorized IP Addresses- All IP addresses that will send email for theFrom Address domain -
(
A3)Yahoo Credentials- You will need a Yahoo account of your own. If you already have one that you’d like to use in association with GreenArrow then you can use that. If you do not already have one you’ll need to sign up for a free account. -
(
A4)Verification Email address-postmaster@theFrom Address domain(A1from above). -
(
A5)Complaint Address- The email address where your GreenArrow Engine install accepts spam complaints. This should be a Spam Complaint Mailbox or a forwarder to one. The spam complaint mailbox is usuallyfeedbackloop-yahoo@PRIMARYDOMAIN, where PRIMARYDOMAIN may or may not be the same domain as yourFrom Address domain. (If you are unsure, GreenArrow Support can help answer this.)
Step 2: Create a DKIM key
You will need to create a DKIM key in your GreenArrow Engine’s web interface. You will be creating the key for the From Address domain from (A1) above.
Note: Make note of the “Selector” that you use here. This is needed below in the “Yahoo Feedback Loop application” section.
Details on creating a new DKIM key can be found in the Creating a New DKIM Key page.
Step 3: Create DNS records
DNS records for DKIM authentication
After a new DKIM key is created, the next step is to create the DNS records for it. Details instructions, including screenshots, can be found in the Creating DNS Records for DKIM page.
DNS records for Sender ID authentication
If there are other systems that are sending mail for this domain (where this domain is in the From address or Return-Path address), you could impact those configurations if this is improperly set up. Be careful to pay close attention to this section to make sure you aren’t disrupting your production email environment.
This step requires:
-
From Address domain(A1above) -
Authorized IP Addresses(A2above)
For your authorized IPs in this section, it is helpful to see if the list of IPs can be condensed down into their shorter CIDR specification. This is possible when you have multiple sequential IPs. To do this you can use a tool like this to convert a range into the CIDR specifications. If you can shorten these down to the CIDR specifications, make note of CIDR specifications, and use those in place of the individual IPs below.
This section uses the domain “greenarrow-example.com” as an example domain. You’ll use your own domain instead when you’re actually creating this for yourself.
Check for existing records
Verify whether there are any TXT records in your existing zone file that begin with spf2.0/pra or spf1. This can be verified by entering your domain in the IP or Host section of http://www.whatsmyip.us/txt and clicking Go.
If you have an existing record, proceed to the next section.
If you do not have an existing record, skip ahead to this section.
“Yes, I have existing spf1 or spf2/pra records”
Either an spf1 or spf2/pra record can be used to authenticate the From Address domain, but if both versions exist you need to make sure to edit the right one:
- If you have an
spf2/prarecord and anspf1record, you should edit thespf2/prarecord. - If you have only an
spf1record, you should edit that record, and not add anspf2/prarecord.
Based on the above, you’ll edit the existing record to add the IP addresses (A2) above or the CIDR specifications, if applicable to the existing record anywhere between the v=spf1 (or v=spf2/pra, depending on your policy) and the all mechanism.
Example:
If your existing record is:
greenarrow-example.com TXT "v=spf2.0/pra ip4:1.2.3.4 ip4:4.2.3.0/24 -all"
And if your CIDR specification for your IP block is:
9.9.9.0/28
Then your new record would look like this:
greenarrow-example.com TXT "v=spf2.0/pra ip4:1.2.3.4 ip4:4.2.3.0/24 ip4:9.9.9.0/28 -all"
Notice the only thing that changed was the addition of “ip4:9.9.9.0/28” to authorize the new block of IPs.
“No, I do not have existing spf1 or spf2/pra records”
If there are no existing spf1 or spf2/pra records then you will need to create one. To do this, you’ll need to figure out if you can provide a full list of all IPs that need to be authorized to send mail for this domain.
This list commonly includes IPs from servers like:
- Your GreenArrow server IPs
- Other mail servers (like your corporate email server)
- Web servers that send email
- 3rd party services (like SendGrid or SMTP.com) that may be sending out emails.
If you can provide all IPs, then you’ll use -all in this record.
If you can not then you’ll use ?all.
Examples:
Here is an example where we can provide a full list of IPs that should be authorized:
(A1) - From Address domain: greenarrow-example.com
(A2) - IPs: 1.1.1.2 - 1.1.1.11 (CIDR Specification: 1.1.1.8/30)
Additional 3rd party service: _spf.google.com
greenarrow-example.com TXT "v=spf1 a mx include:_spf.google.com ip4:1.1.1.2/31 ip4:1.1.1.4/30 ip4:1.1.1.8/30 -all
Here is an example where we can not provide a full list of IPs that should be authorized:
(A1) - From Address domain: greenarrow-example.com
(A2) - IPs: 1.1.1.2 - 1.1.1.11 (CIDR Specification: 1.1.1.8/30)
Additional 3rd party MTA: _spf.google.com
greenarrow-example.com TXT "v=spf1 a mx include:_spf.google.com ip4:1.1.1.2/31 ip4:1.1.1.4/30 ip4:1.1.1.8/30 ?all"
For more details on SPF and Sender ID you can review our documentation here.
Testing the email authentication
Once you have your email authentication set up, it is a good idea to test it out. You can do this by sending yourself a test email through GreenArrow to an email address that you own at an ISP where you know that Sender ID and DKIM are checked, and then reviewing the headers. For example, Hotmail / Outlook.com checks Sender ID and DKIM.
Step 4: Setup the Yahoo Feedback Loop
This step requires that:
- You have a DKIM key created
- The DKIM public key is configured in DNS
- You know the “Selector” for the DKIM key
- You are able to receive email sent to to the
postmaster@Verification Email address (A4) - You know the email address that your GreenArrow Engine install accepts spam complaints at (
A5)
In the examples below, you’ll need to replace DOMAIN with your actual From Address domain name (A1).
The acronym “CFL” is used on this registration page. This stands for Complaint Feedback Loop. This is simply the term by which Yahoo refers to their Feedback Loops (also referred to as “FBL”).
- If GreenArrow Engine is handling email for this
From Address domain(A1) then:- Log into GreenArrow Engine and go to
Configure=>Domains - Click on the
Edit users/forwarderslink for theFrom Address domainyou are setting up. - Find
postmaster@DOMAINand click the “Edit” link if it exists.- Add an address you can access in the
Forward tobox. Do not removeroot@DOMAINor any other existing forwards from the list. - Click
Submit.
- Add an address you can access in the
- If
postmaster@DOMAINdoes not exist, click theAdd new email forwarderbutton.- Add abuse in the
Email addresstext field. - Add the email address you wish this to forward to in the
Forward totext box. - Click
Submit.
- Add abuse in the
- Log into GreenArrow Engine and go to
- If GreenArrow Engine does not handle email for this
From Address domainthen do one of the following:- Create a mailbox for
postmaster@DOMAINon the mail system being used for that domain that you can access. - Create a forward for
postmaster@DOMAINon the mail system being used for that domain to point to an address you have access to.
- Create a mailbox for
- Send a test message to the
postmaster@verification email address to confirm that you are in fact receiving email send to this address. - Go to https://www.yahoo.com and login (
A3). - Once logged in, go to https://help.yahoo.com/kb/postmaster/ and click on the
Complaint Feedback Loopbutton.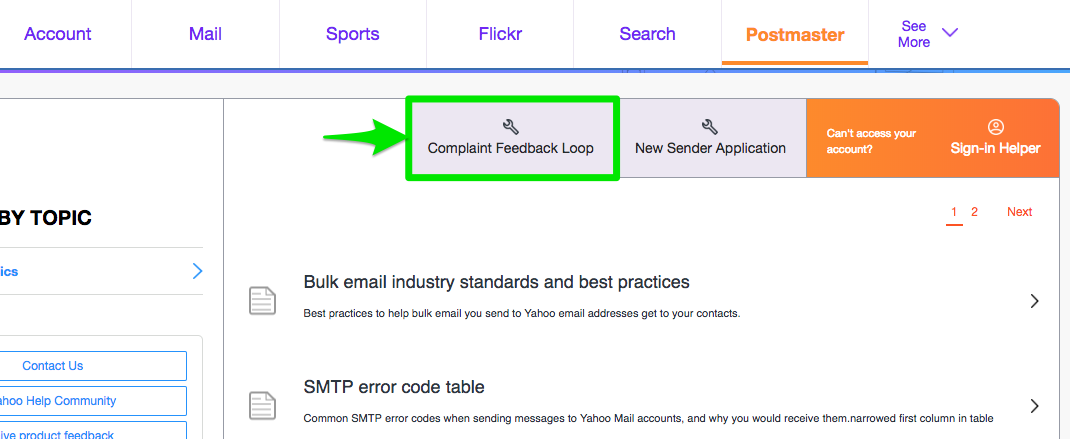
- Fill in the fields in the
Yahoo Complaint Feedback Loop Serviceform with the appropriate information. This will need to be done once for each From Address domain (A1):- Provide Company name, Contact name, Phone and Contact email
- Reporting Email:
feedbackloop-yahoo@DOMAIN(A5from above). - Selector: This is the selector from the DKIM key generated above. This information can be found in GreenArrow Engine by going to
Configure=>DKIM Keysand clickingViewnext to the DKIM key you’re registering: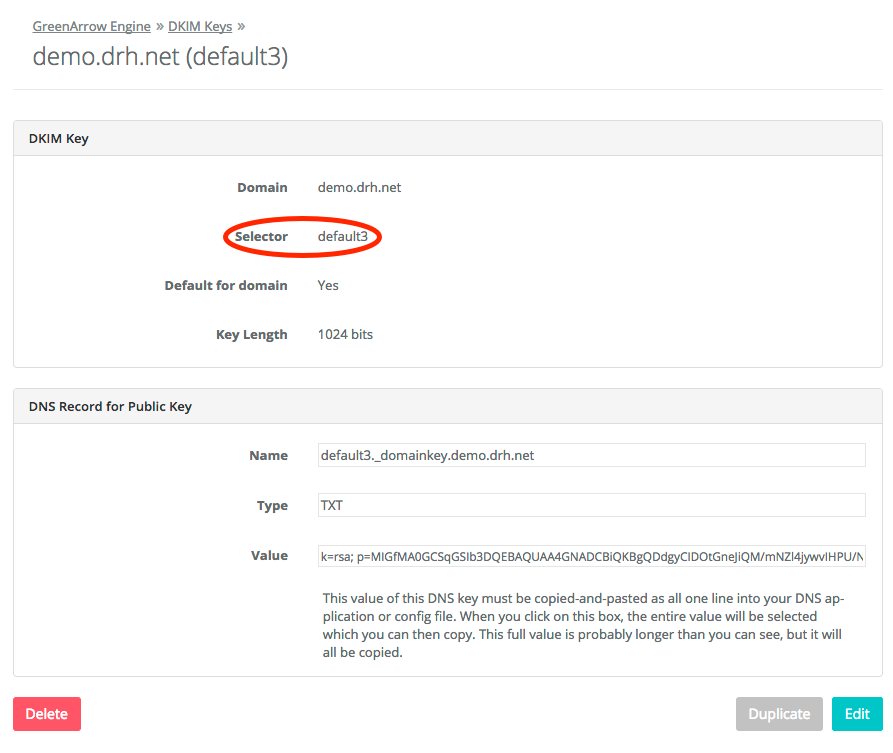
- Request Type:
Add - Domain: This is the From Address domain (
A1) you wish to add. - Click on the button
Get Verification Code. Yahoo will send a verification email topostmaster@DOMAIN -
Do not close the form yet. Wait for the verification message and copy and paste the confirmation code into the
Verification codefield - Click on the
Create Requestbutton